Introduction
Unknowingly, we’ve arrived in the year 2023, and MongoDB has already released version 7.0. MongoDB has pioneered the unique category of document model databases, bringing us many surprises in terms of products, technology, and business. More and more developers are developing their applications with MongoDB.
Often times, when developers are working with MongoDB, they need to move data from existing relational databases into MongoDB to support new use cases. Because MongoDB’s unique, denormalized document model, it often means we need to sync data from multiple relational tables into a target JSON. This article is aimed to illustrate a convenient method to achieve this purpose.
MongoDB Unique Features
Before the advent of MongoDB, developers primarily working with SQL databases often followed the
traditional three-normal form standards when designing data table structures. Under this standard,
data from different domains that were related to each other were often designed as separate table
structures and then linked using some association criteria. While maintaining data accuracy was
relatively easy due to the existence of independent data, developers often had to write complex SQL
queries to meet their business requirements.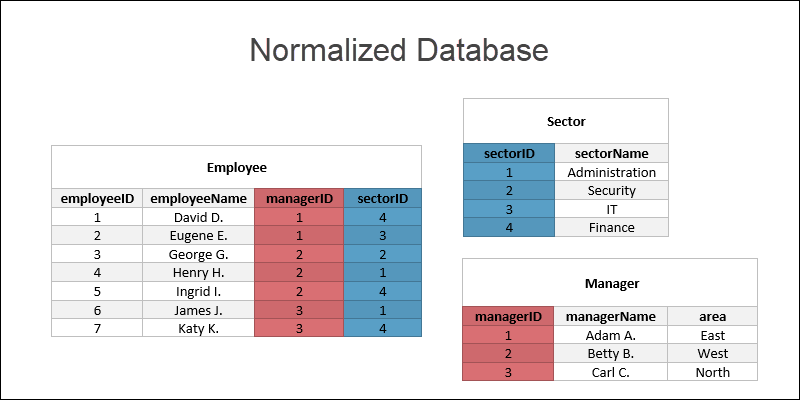
MongoDB’s usage pattern, on the other hand, is quite the opposite. MongoDB encourages developers to
directly integrate related data in the form of documents, embedded documents, or arrays, providing the
final data model based on business requirements. This greatly reduces the cost of development for
developers. However, it also brings challenges in maintaining data consistency.
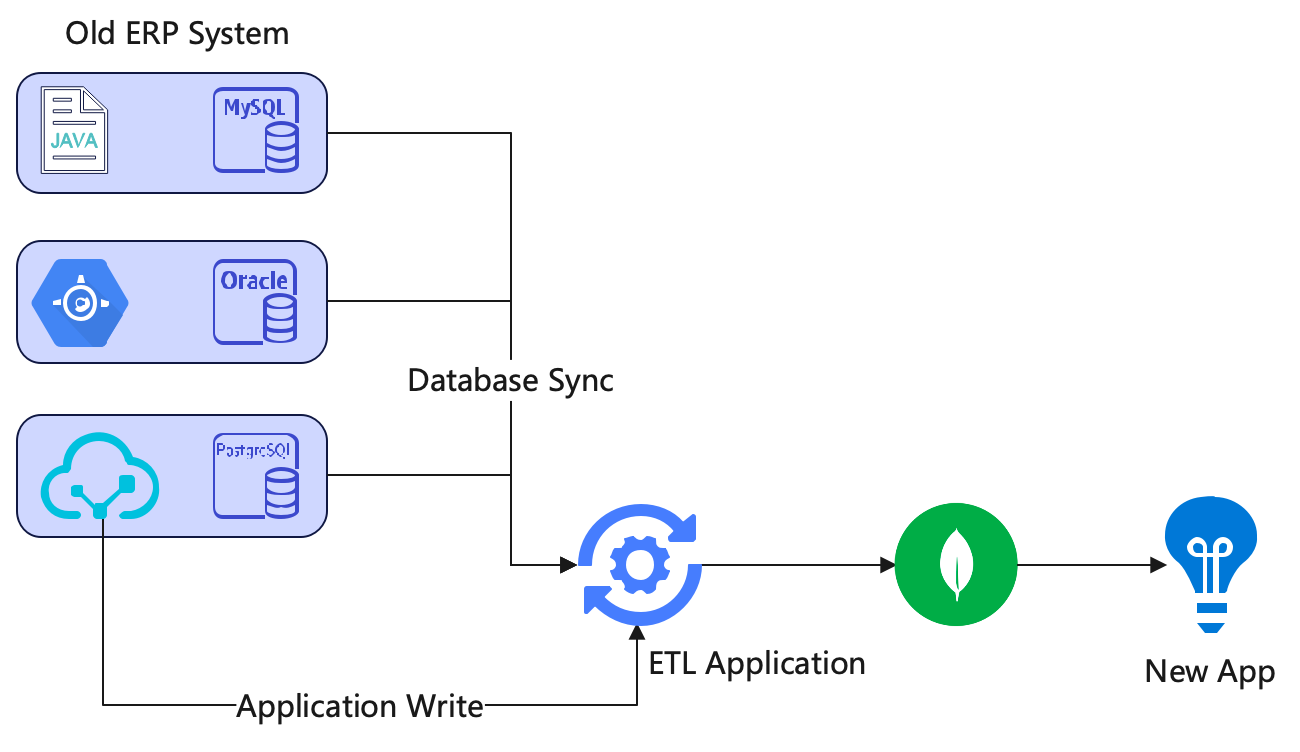
In many scenarios, developers integrate MongoDB with existing databases using the pattern shown in
the following diagram:
This undoubtedly adds unnecessary cognitive burden on developers. Now, let’s consider a hypothetical e-commerce scenario to see how TapData eliminates this burden for developers.
Building a Denormalized Order Table In MongoDB
Imagine a scenario in the e-commerce order context where there are five related tables:
- Order table (order): Records an order.
- Sub-order table (sub_order): Each order contains at least one sub-order, and sub-orders are associated with products and logistics.
- Product table (product): Records product information for each sub-order.
- User information table (user): Records user information.
- Logistics table (logistics): Records logistics information for each sub-order.
Now, in this new business scenario, their development team is using MongoDB as the database and wants to build a new order table that includes data from these existing tables. Let’s go step by step using TapData’s real-time materialized view functionality to accomplish this.
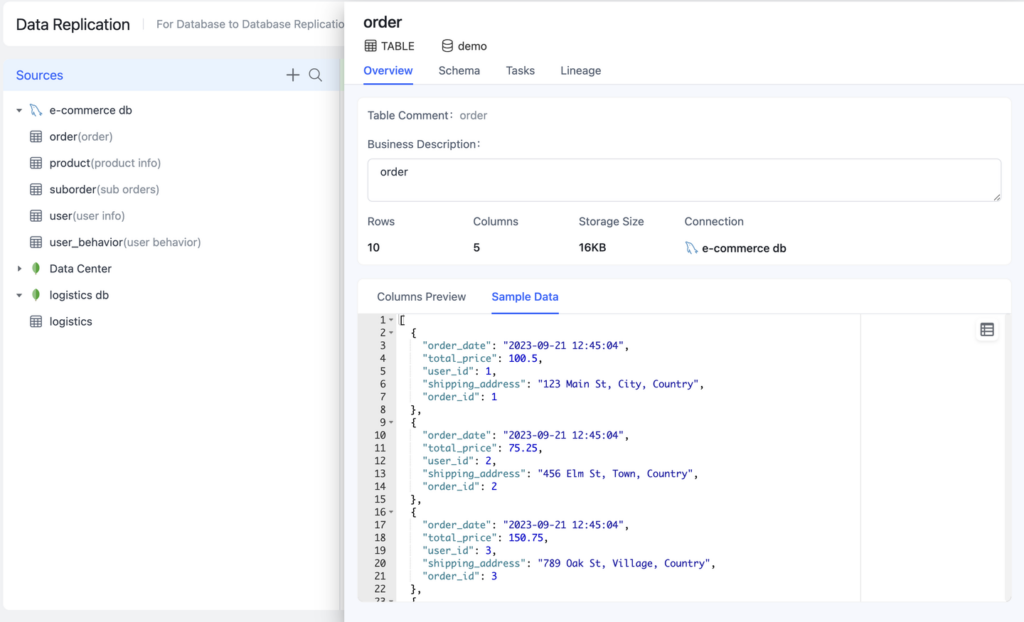
Creating Data Source
Before starting the task, you first need to add three data sources to the platform. Choose the
“Connection Management” menu at the bottom left, click the “Create” button, select the data source
type, and complete the information as prompted. After creating them, it’s recommended to click the
connection test to ensure all information is accurate.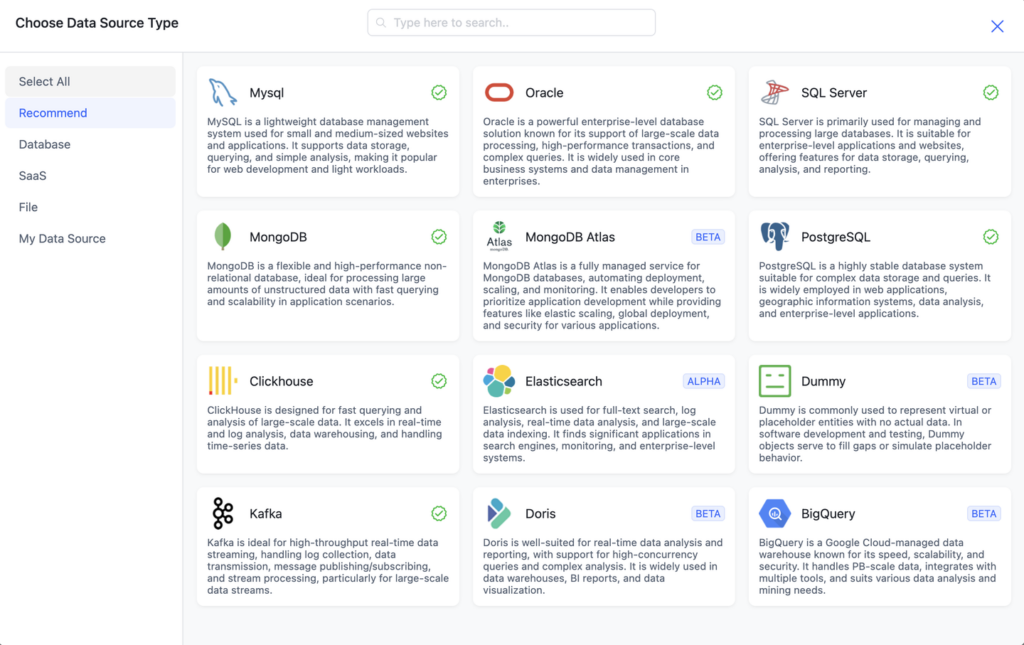
- Add a MySQL data source named “e-commerce db” containing four tables: order, suborder, product, and user.
- Add a MongoDB data source named “logistics db” containing the logistics table.
- Add a MongoDB data source named “Data Center” which currently contains no tables.
After completing the creation, check the Connections as shown in the following image to confirm that
everything is ok.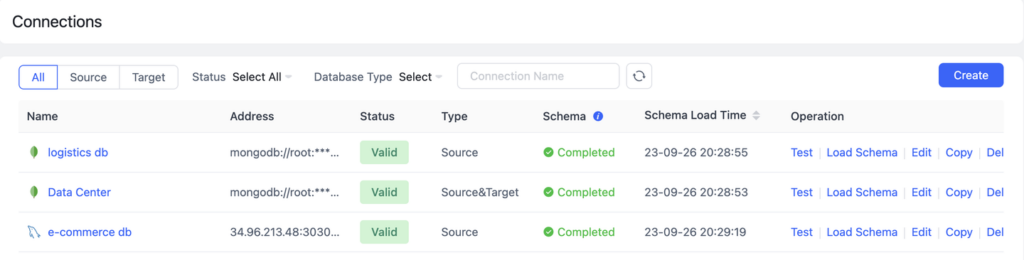
Building Materialized Views
Select the “Data Transformation” menu on the left and click the “Build Materialized View” button on the right. This will open a blank canvas where all subsequent operations will take place.
First, select the “order” table from the “E-commerce Database” as the main model table. Once
selected, the data model of the order table will immediately appear on the canvas, as shown below.
Remember the “Add Field” button, as all subsequent operations will revolve around it.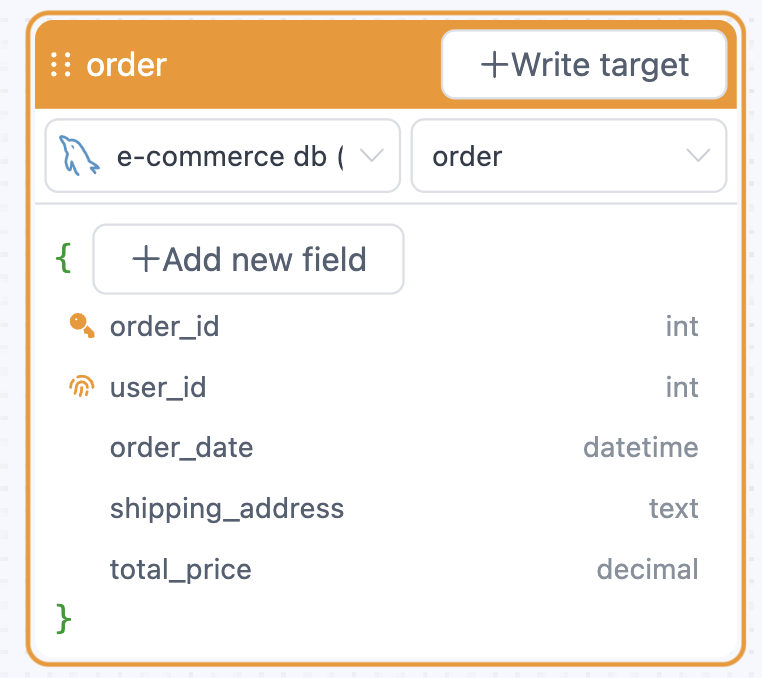
On the order table model, start by adding user information. Embed it under the “user” sub-document.
Here are the specific steps: Click “Add Field,” select “Embedded Document,” enter “user,” and confirm.
Then, on the new table that pops up on the left, select the “E-commerce Database” and the “user”
table, and choose the user_id as the matching condition. Now, on the right side of the main table, you
can see a new “user” field containing user information related to the order.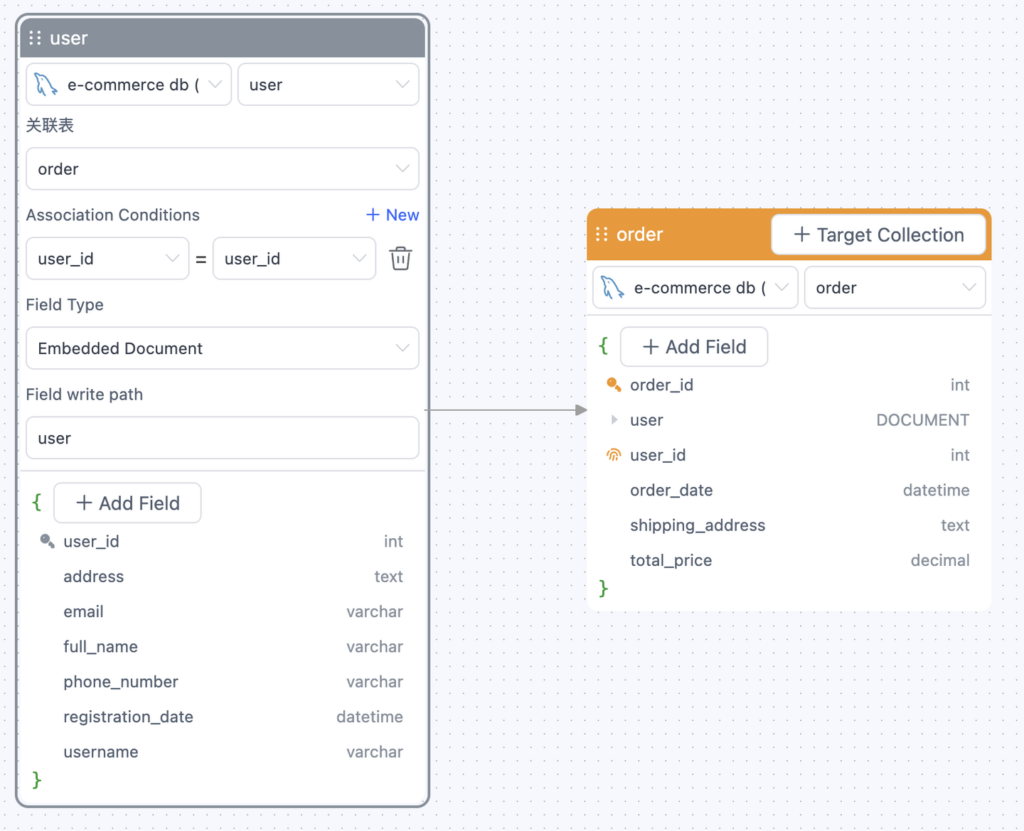
Next, add sub-order information. Since one order can contain multiple sub-orders, we’ll use an array to store this information under the “sub_orders” path. Here are the steps: On the order table, click “Add Field,” select “Embedded Array,” enter the path as “sub_orders,” and confirm. Similar to the user information, choose the “sub_order” table and set the matching condition.
Finally, for the information within sub-orders, continue by completing two attributes: product attributes and logistics attributes. This time, click “Add Field” on the “sub_order” table and use a flat structure to directly place these two pieces of information under the sub-order.
After completing all configurations, the final product on the canvas should look like this: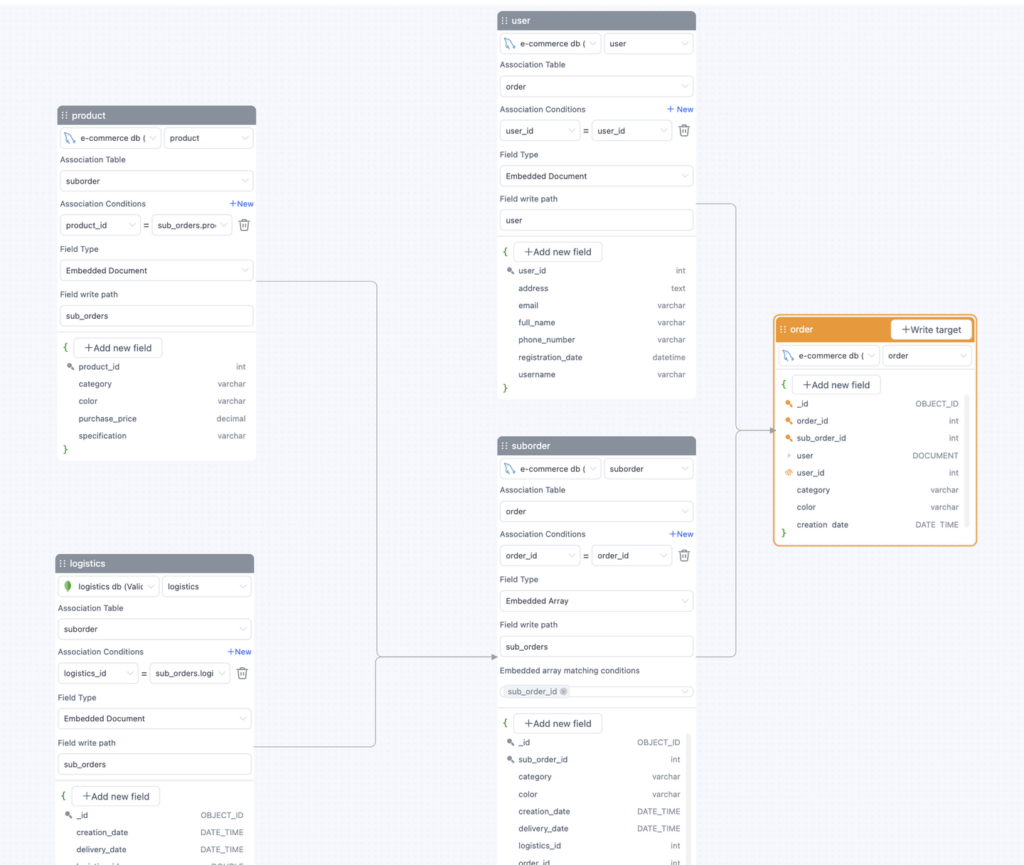
So far, a large order table that combines information from all data tables has been constructed.
Now, for the last step, click the “+Write to Target” button on the main order table to select the
MongoDB target to which this order table should be written. Once done, the task is complete, and the
final result is as shown in the image below: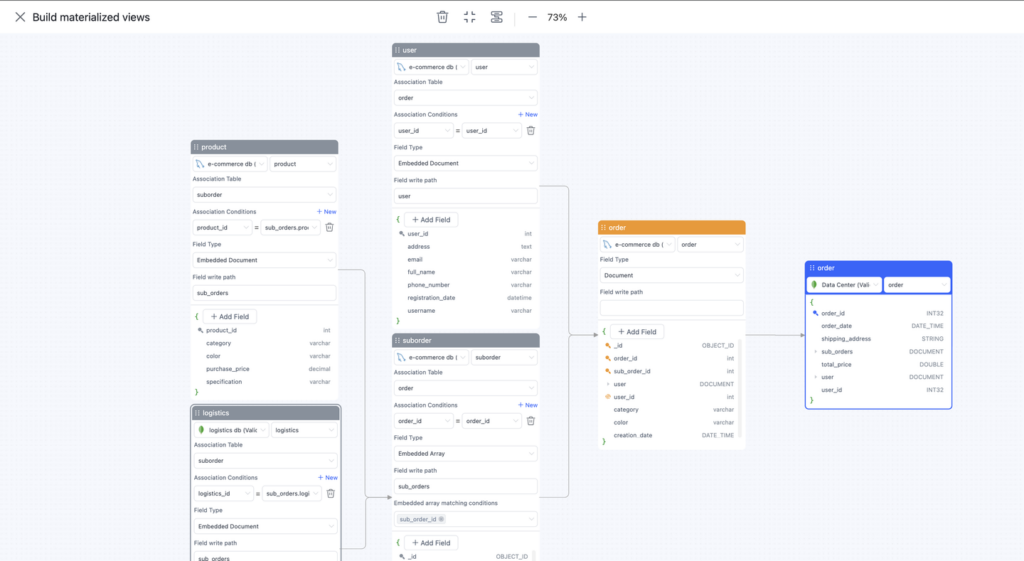
Starting the Task and Viewing Data
In the final step, click the “X” in the top left corner to return to the task page, then start the task and wait for data synchronization.
After clicking “Start,” you can see progress descriptions for each step at the bottom of the page.
Once the task enters the incremental stage, go back to the data panel, where you can now view
real-time data samples of this materialized view.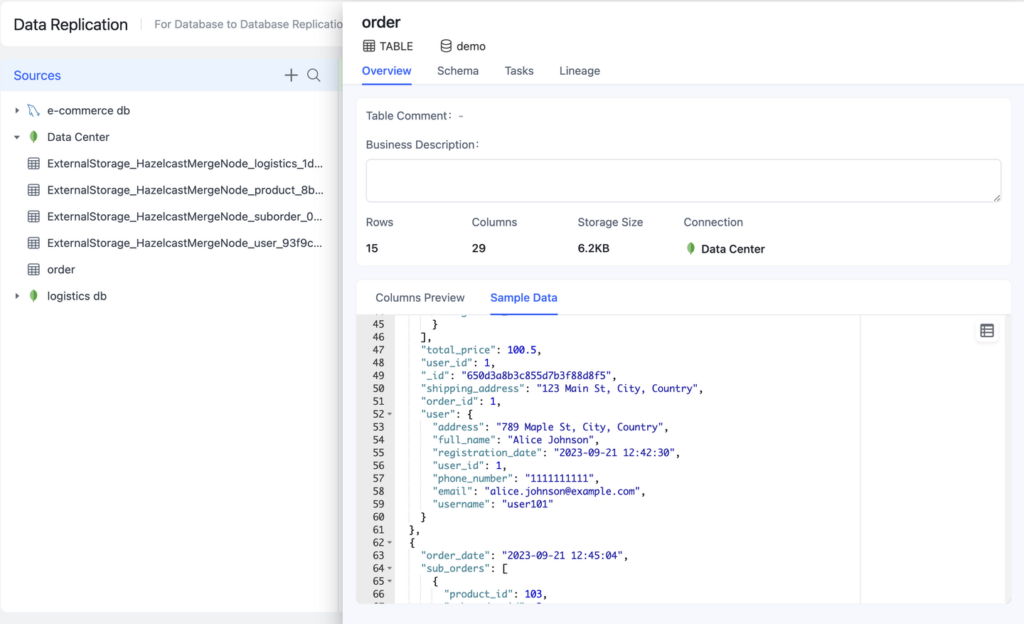
Fresh Data Model
Tasks built using the real-time materialized view feature in TapData Cloud ensure that all data changes in the source database, whether it’s updates to user information, new logistics information, or changes in order status, are reflected in the unified structure within seconds. New business applications can be directly developed based on this unified model.
What’s more critical is that if adjustments need to be made to this model in the future, such as modifying some fields or adding new table information, you only need to edit the task and restart it. Within a short time, the data in the target will be updated. This process takes only a few minutes, greatly enhancing production efficiency compared to the traditional way of adjusting business code logic and completing testing before seeing the results.
Now, new TapData Cloud users can still enjoy a permanent free trial offer. Welcome everyone to give it a try!